The following presentation presupposes some familiarity with the principles of high-pass resolution perimetry, as outlined in the HRP overview.
The present demo differs from the regular test in several important respects:
The demo uses a simple qualitative calibration procedure. This should work well in one and the same computer set-up but exact comparisons of results with other set-ups will not be possible
There are four target locations only, namely, the quadrant centers
Target locations are not tested in a random order. Instead, a target will be flashed repetitively in one and the same location, until another quadrant is selected
The complex thresholding strategy of the original test is replaced by simple up-down steps comprising 1 dB
There is no adaptation to individual reaction time, nor any control or feedback devices
There is no statistical analysis of results
Results can be stored as screen dumps only (PrintScreen → MSPaint, or similarly)
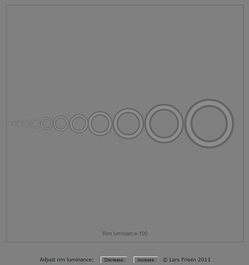
To minimize distractions, the demo is presented in a separate full-screen window, with a neutral background. Before starting the demo, take note of the calibration procedure. In the miniature image to the right, note the opening display of a range of target sizes. With a correct calibration of the test display, the targets should imperceptibly melt into the background, one by one, with successive increases in viewing distance. Cores and rims should vanish at exactly the same distance, otherwise the target rim brightness needs to be adjusted, using the buttons at the bottom of the display. Take note of the appearance of the smallest visible target and increase viewing distance slightly. If there is a lingering dominance of the light target core, the dark rims need to be made darker. Conversely, if the appearance is dominated by the dark rims, these need to be made lighter. Make a note of the correct brightness setting.
Once calibration is done, click on the central-most test target to enter test mode. Note how the dynamic fixation mark cues in the brief appearance of a test target in the center of one quadrant. To change the target size, move the cursor into the active quadrant and click the right or left mouse button (right-clicks increase size, left-clicks decrease size). Make sure the cursor is placed outside the fixation area but within the display outline. The test does not respond to clicks made outside the outline. The current target size is shown by faint blue digits in the outer quadrant corner. Exposure time is 200 ms.
To find the threshold, look at the fixation mark, and change target size up and down until the smallest discernible target has been found. Once the treshold has been found in the first quadrant, click in another quadrant and repeat the stepping procedure. Each quadrant can be re-visited any number of times. Once done with all four quadrants, click on the fixation mark to display the test results. To reset, tap the keyboard function key F5.
Suggested testing distance is 0.3 m. By altering the test distance, and possibly rotating the display screen, additional locations in the visual field can be accessed.
To use the demo as a real test, it is necessary to work in a dark space. If quantitative analyses are contemplated, it is necessary to record viewing distance(s), target positions and target sizes at threshold, and to make some calculations. Target sizes are given as the widths, in pixels, of the bright cores. This measure is equivalent to the gap size in the classical
Landolt C optotype [
1]).
The angular subtense of pixels can be calculated from the pixel size, as given by the screen manufacturer, and the viewing distance.Further, note that the calibration procedure is not exact enough to allow reliable comparisons with other computer set-ups. The brightness setting is nominal only and does not necessarily belong to a linear scale.
Normal limits have to be defined individually for each set-up, from test results obtained from normal subjects.
 To minimize distractions, the demo is presented in a separate full-screen window, with a neutral background. Before starting the demo, take note of the calibration procedure. In the miniature image to the right, note the opening display of a range of target sizes. With a correct calibration of the test display, the targets should imperceptibly melt into the background, one by one, with successive increases in viewing distance. Cores and rims should vanish at exactly the same distance, otherwise the target rim brightness needs to be adjusted, using the buttons at the bottom of the display. Take note of the appearance of the smallest visible target and increase viewing distance slightly. If there is a lingering dominance of the light target core, the dark rims need to be made darker. Conversely, if the appearance is dominated by the dark rims, these need to be made lighter. Make a note of the correct brightness setting.